A Mutable Log
A blog by Devendra Tewari
Project maintained by tewarid Hosted on GitHub Pages — Theme by mattgraham
Use SPI bus with the Raspberry Pi Pico
Synchronous Peripheral Interface aka SPI is a rather fast and flexible serial interface although it is unable to support as many devices per bus as the I2C bus. We’ll explore how to use this bus on the Raspberry Pi Pico board, by interfacing it with the commonly available BME680 environmental sensor from Bosch.
Parts
The list of parts we need is rather short
- A Raspberry Pi Pico or equivalent module
- A micro USB data cable to deliver power to and interface with the board
- A grove BME680 sensor from Seeed Studio
You’ll need to have the Arduino IDE set up and ready to go on your computer.
Wiring Diagram
We’ll wire the sensor to the board as follows
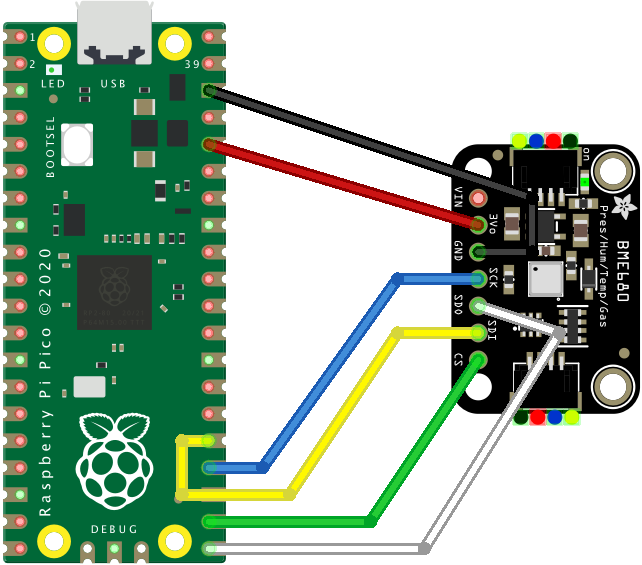
Note that the diagram shows the Adafruit BME680 sensor that is equivalent to the grove BME680 sensor from Seeed Studio.
BME680 grove sensor uses the I2C interface by default. To use the SPI interface, you’ll need to physically sever two traces indicated by I2C and 0x76 labels on the bottom side of the PCB. This can be done by lightly but repeatedly scratching with a pointed cutting tool of some kind.
Configure board in Arduino IDE
Assuming you’ve got the Arduino IDE setup and ready to go, you need to add https://github.com/earlephilhower/arduino-pico/releases/download/global/package_rp2040_index.json in Additional Boards Manager URLs, in Preferences.
Head over to Tools menu, Board, Board Manager, and install Raspberry Pi Pico/RP2040 board support.
Configure Adafruit BME680 library
Head over to the Sketch menu, Include Library, Manage Libraries, and install Adafruit BME680 Library.
Example code
Head over to File menu, Example, Adafruit BME680 Library, and pick bme680test. This will create a new sketch based on bme680test example.
Modify example
The bme680test example is configured to work over the I2C interface by default.
To get it to work over SPI, you’ll need to modify the following lines
Change value of BME_CS to GPIO 17
#define BME_CS 17
Comment creation of I2C interface
//Adafruit_BME680 bme; // I2C
Uncomment creation of SPI hardware interface
Adafruit_BME680 bme(BME_CS); // hardware SPI
Run example
Head over to Tools menu, Board, Raspberry Pi Pico/RP2040, and pick board Raspberry Pi Pico.
Connect the board to your computer, and pick the correct serial port under Tools menu, Port.
Under Sketch menu, select Upload.
Arduino IDE will now build and upload the example code
Sketch uses 71336 bytes (3%) of program storage space. Maximum is 2093056 bytes.
Global variables use 11580 bytes (4%) of dynamic memory, leaving 250564 bytes for local variables. Maximum is 262144 bytes.

--------------------------
Compilation complete.
Resetting /dev/cu.usbmodem144143101
Converting to uf2, output size: 156672, start address: 0x2000
Flashing /Volumes/RPI-RP2 (RPI-RP2)
Wrote 156672 bytes to /Volumes/RPI-RP2/NEW.UF2

--------------------------
upload complete.
Example output
To see the output, head over to Tools menu, and select Serial Monitor.
You should see text such as the following print repeatedly
Temperature = 32.59 *C
Pressure = 1010.79 hPa
Humidity = 64.26 %Gas = 68.29 KOhms
Approx. Altitude = 20.50 m