A Mutable Log
A blog by Devendra Tewari
Project maintained by tewarid Hosted on GitHub Pages — Theme by mattgraham
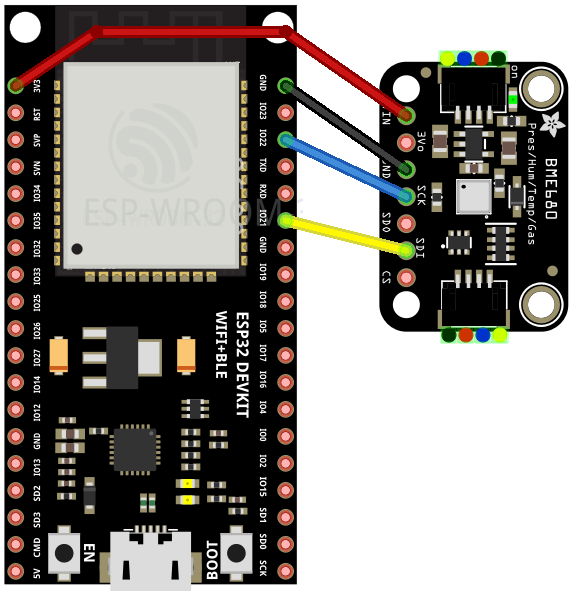
Use I2C bus with the 38-pin ESP-32 Module
The I2C bus is a multi-device two-wire half-duplex 8-bit synchronous serial interface. Typical clock speeds are 100 KHz and 400 KHz. Device addresses are 7-bit and usually hardcoded in the device. This necessitates use of separate busses to interface with devices that have the same address.
In this post, we’ll use an ESP-32 38-pin module to interface with the common BME680 environment sensor from Bosch. We’ll use the Arduino IDE to develop our code, and while there are several good Arduino libraries for the BME680, we’ll develop code from scratch to do something as simple as detect BME680 sensor on the I2C bus.
Connect the BME680 sensor module as shown in the wiring diagram below
Here’s an Arduino Sketch that queries the sensor id register 0xD0, and thus senses a BME680 on the I2C bus if the value read is 0x61
#include <Wire.h>

#define I2C_ADDRESS 0x76

#define I2C_Freq 100000

#define I2C_SDA_0 21
#define I2C_SCL_0 22

TwoWire I2C_0 = TwoWire(0);

void setup() {
  Serial.begin(115200);
  while (!Serial);

  // Setup I2C interface
  I2C_0.begin(I2C_SDA_0, I2C_SCL_0, I2C_Freq);

  // Read id register 0xD0 and check we can communicate with BME680
  I2C_0.beginTransmission(I2C_ADDRESS);
  I2C_0.write(0xD0);
  I2C_0.endTransmission();
  I2C_0.requestFrom(I2C_ADDRESS, 1);
  byte id = I2C_0.read();
  if (id != 0x61) {
    Serial.println("Couldn't find BME680!");
  }
}

void loop() {
  // Read data from BME680
  Serial.println();
  delay(3000);
}
We define some constants and setup the TwoWire API to interface with the BME680 using device address 0x76, I2C frequency 100 KHz, and I2C bus 0 with GPIOs 21 (SCL) and 22 (SDA).
Note that depending on the wiring of the BME680 module, if you are unable to detect the device, I2C address may need to be changed to 0x77.
#define I2C_ADDRESS 0x76

#define I2C_Freq 100000

#define I2C_SDA_0 21
#define I2C_SCL_0 22

TwoWire I2C_0 = TwoWire(0);

void setup() {
  Serial.begin(115200);
  while (!Serial);

  // Setup I2C interface
  I2C_0.begin(I2C_SDA_0, I2C_SCL_0, I2C_Freq);
Whereas the TwoWire API gives more control, the simpler Wire API can be used if you are happy to use the default I2C bus and GPIOs. The above code can then be simplified to
#define I2C_ADDRESS 0x76

TwoWire I2C_0 = Wire;

void setup() {
  Serial.begin(115200);
  while (!Serial);

  // Setup I2C interface
  I2C_0.begin();
Next, in the setup function, we initiate a write to register 0xD0, in preparation to read from it
  I2C_0.beginTransmission(I2C_ADDRESS);
  I2C_0.write(0xD0);
  I2C_0.endTransmission();
Finally, we send a read request and verify that the value read is 0x61
  I2C_0.requestFrom(I2C_ADDRESS, 1);
  byte id = I2C_0.read();
  if (id != 0x61) {
    Serial.println("Couldn't find BME680!");
  }
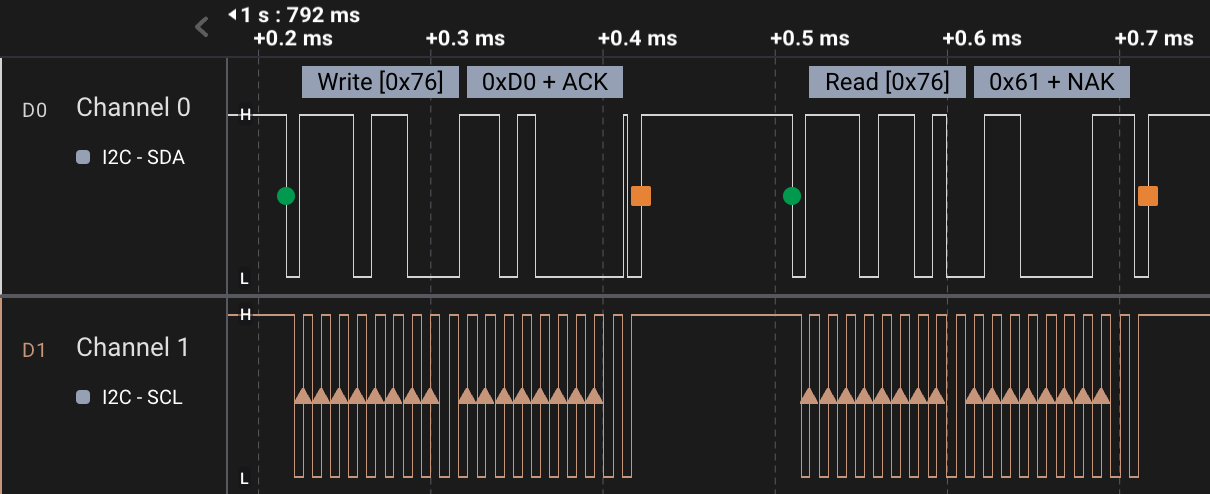
Arduino’s Wire API and hardware handles bus start/stop and ack/nak signaling required by I2C. Here’s a logic analyzer probe of the I2C bus when doing the above operations
Multiple devices, as long as they have different addresses, can similarly be connected to and conversed with on the same I2C bus.